SparkFun Inventor's Kit for micro:bit Experiment Guide
 D___Run___,
  bboyho
 Introduction to the SparkFun Inventor's Kit for micro:bit
The SparkFun Inventor's Kit for micro:bit Experiment Guide is your map for navigating the waters of beginning embedded electronics, robotics and citizen science using the micro:bit. This guide contains all the information you will need to explore the 12 circuits of the SparkFun Inventors Kit for micro:bit. At the center of this guide is one core philosophy --- that anyone can (and should) experiment with cutting-edge electronics in a fun and playful way without breaking the bank.
When you're done with this guide, you'll have the know-how to start creating your own projects and experiments. From building robots and game controllers to data logging, the world will be your oyster. Now enough talking --- let's start tinkering!
Included Materials
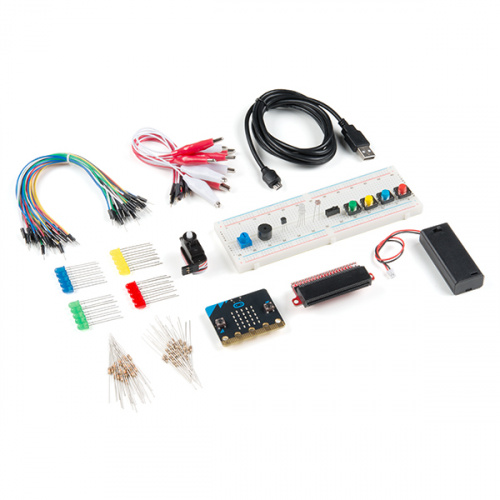
The SparkFun Inventor's Kit (SIK) for micro:bit includes the following:
- micro:bit --- The brains of the outfit with a bunch of onboard components. The version will vary depending on the kit or lab pack that you ordered.
- micro:bit Breakout (with Headers) --- Allows you to connect the micro:bit to the breadboard. The version will vary depending on the kit or lab pack that you ordered.
- Breadboard --- Excellent for making circuits and connections off the micro:bit. We included a full-sized breadboard to give you plenty of room.
- Small Servo --- Here is a simple, low-cost, high-quality servo for all your mechatronic needs.
- Piezo Buzzer --- BUZZZZ! Used to make different frequencies of sound.
- USB micro-B Cable --- This 6-foot cable provides you with a USB-A connector at the host end and standard B connector at the device end.
- Male-to-Male Jumper Wires --- These are high-quality wires that allow you to make connections with components on the breadboard.
- TMP36 Temperature Sensor - A sensor for detecting temperature changes.
- Photocell --- A sensor to detect ambient light. Perfect for detecting when a drawer is opened or when nighttime approaches.
- Tri-Color LED --- Because everyone loves a blinky.
- Red, Blue, Yellow, and Green LEDs --- Light-Emitting Diodes make great general indicators.
- Momentary Pushbutton Switch --- Go crazy with buttons.
- 10kΩ Trimpot --- Also known as a variable resistor, this is a device commonly used to control volume and contrast, and makes a great general user control input.
- 100Ω Resistors --- Great current-limiting resistors for LEDs, and strong pull-up resistors.
- 10kΩ Resistors --- These make excellent pull-ups, pull-downs and current limiters.
- 2x AAA Battery Pack --- AAA battery pack with the JST connector that fits the micro:bit
- Alligator Clip with Pigtail --- A great way to connect individual components on a breadboard to the micro:bit ring connectors.
| SparkFun Inventor's Kit micro:bit SKU |
Revision History |
|---|---|
| KIT-17362, LAB-17363 | - Switch to micro:bit V2. - Switch to Qwiic micro:bit breakout board (with headers). |
| KIT-15228, LAB-15229 | Switch to 2xAAA battery holder with a built-in switch. |
| KIT-14542, LAB-14301 | Initial release. |
What's that? You've already got a micro:bit but still want to follow along? We have options!
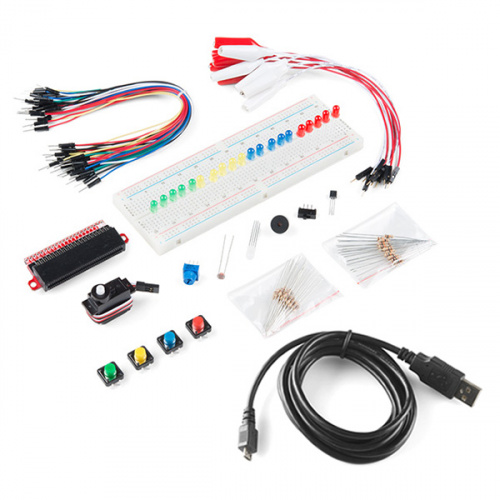
- Get the handy dandy SparkFun Inventor's Kit Bridge Pack for micro:bit, which contains all of the items in the SIK kit except for the micro:bit. You can get all the parts in one fell swoop and a nice red box to boot!
- Alternatively, you can pick and choose parts for individual experiments. This is a great option for folks who may already have some of the items in this tutorial just hanging around. Throughout this guide, we will provide links to the parts used for each circuit. Below is a wishlist for the parts used in the kit. Depending on what you have, you may not need everything on this list. Add it to your cart, read through the guide, and adjust the cart as necessary.
Suggested Reading
Before continuing with this guide, we recommend you be somewhat familiar with the concepts in the following tutorials:
- Voltage, Current, Resistance, and Ohm's Law --- The most basic concepts in electronics and electrical engineering. Get very familiar with these concepts, as they will be used throughout your electronics adventure.
- What is a Circuit? --- In this guide, we will be building a variety of circuits. Understanding what that means is vital to understanding the Inventor's Kit.
- How to Use a Breadboard --- First time working with a breadboard? Please check out this tutorial! It will help you understand why the breadboard is great for prototyping and how to use one.
What is a Circuit?
Voltage, Current, Resistance, and Ohm's Law
How to Use a Breadboard
Open Source!
All of our experiments and guides are licensed under the Creative Commons Attribution Share-Alike 4.0 Unported License. Feel free to remix and reuse our work. But please, share the love and give us attribution for our hard work!
To view a copy of this license visit this link, or write: Creative Commons, 171 Second Street, Suite 300, San Francisco, CA 94105, USA.